Saturday, February 26, 2011
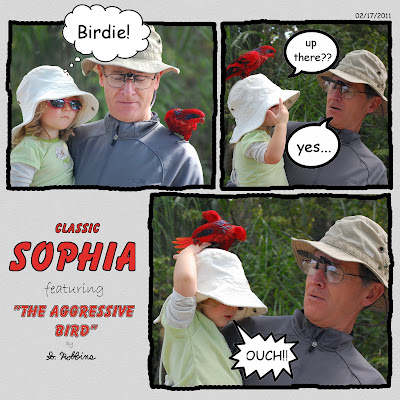
Comic strip layout
I took these photos of my daughter and my dad at a zoo in Florida. Unfortunately, my poor little daughter has not had much luck with zoo animals. Just a few months ago, she had her hair pulled by a monkey. Here, she is getting bit by a bird! It left a small mark but didn't break any skin. Now, she enjoys telling the story and pointing to the spot where the beak pinched her tiny hand.
The mistake we made was telling her that the bird was on her head. As you can see, she pointed upward inquisitively before putting her hand up there.
I wanted to portray this scene as a sequence of events, and I thought showing it comic-strip style would be cute.
The layout was very easy to do. I drew the outlines of the pictures with the mouse to give it a more hand-drawn feel. The bubbles I grabbed from the internet (I hope I'm not violating any copyright for that).
For the title, I copied the format of the Peanuts comic strip. To get the outline of the text, simply right-click on the layer > Alpha to Selection. Then, Edit > Stroke Selection. Make sure the forground color is black and have it draw a straight line.
I threw my signature in there to make it look even more like a cartoon.
I've always thought that a scrapbook layout should tell a story, and this is just one more way that it can be done.
Monday, February 21, 2011
Digital collages
Here's my first try at making a digital collage by combining photos into one image. It's not technically perfect, but it's a style that I'd like to work on and use in the future.
I took these photos of my daughter on a bright, sunny day last spring. I loved the vibrant color of her pink shirt against the green grass. Since she doesn't pose for pictures (no toddler does), I simply chased her around and snapped as many shots as I could get. I got many of her running away from me, some of her playing with the pebbles, and a few of her staring at the ground.
I've always enjoyed putting several shots of the same scene on a scrapbook page. Photos taken just a few seconds apart can show completely different facial expressions, and it's fun to look at them side-by-side on a page.
With traditional scrapbooking, one must take each print and arrange them on the page. If you're really good, you may be able to crop around the person to make something a little more dynamic.
With the computer, however, you can take collage-making to another level. You can adjust the size and transparency of an image, duplicate an image, flip an image, and use many more simple techniques to make some crazy stuff. In fact, the most time-consuming part of this layout was cropping around each photo.
As with photography, composition is the most important part of making an interesting layout. I used the photo in which she is looking at the camera as the focal point. Following the "rule of thirds," I placed her to the lower left.
To add more visual interest, I threw in a supernova effect on top of the pebble she was holding. This is very easy to do. Go to Filters > Light and Shadow > Supernova. I adjusted the hue to a greenish color to go with the color of the grass.
I decided to lower the opacity of some of the layers to give the layout an ethereal look. Why did I do this? Simply because I currently lack the technical skills to get it to look, well, real. Once I master the skill of blending, I will make layouts that make people think that I have quadruplets.
Combining images like this into a digital collage is one more way to display your photos together. By playing around with the images, you can create some very neat effects.
Friday, February 18, 2011
Making lemonade from lemons
Sometimes, those less-than-perfect shots CAN be perfect for the right layout. A dark shot can create a somber mood, a blurry shot may be good for a background, or a goofy face may go well with humouous journalling.
For anyone who doesn't have kids, let me tell you that two-year-olds don't pose. They don't smile just because you tell them to, either. For this reason, I'm becoming an expert at making due with the shots that I get.
I was trying to get a picture of her to send out for our Christmas cards, which was a very difficult task indeed. The shot was in focus, but she was not looking at the camera, the picture was inproperly framed, and it was underexposed because she ran into a shadow.
Yet I had written a few heartfelt words about her, and wanted a photo to convey the somber mood. This one couldn't have been more perfect. The journalling reads:
I wish
I wish I could prevent you from making the mistakes I've made
I wish love could banish all pain and sorrow from your life
I wish you could stay in you childhood forever
I wish I could shelter you from reality
But I can't
So I will teach you all that I know
I will arm you against the evils of the world
I will tell you that what is popular isn't always what is best
I will show you that no one and no movement has control over you,
So... I will.
Before hitting that "delete" button on your camera, try to think of interesting ways to use those imperfect shots.
Wednesday, February 16, 2011
Irony
So here's another advantage of digital scrapbooking: it's easy to go BIG.
When I was using paper and glue, I used only 4x6 pictures. I could have gotten larger prints, but they are much more expensive. Besides, I would have had to plan out all my layouts in advance and wait for the prints to come in. It was much easier to use 4x6 pictures and throw the extras in a regular photo album.
With digital scrapbooking, I can create poster-size prints of my favorite photos. They look great on the wall inside a 12x12 album frame. I like to jazz them up with a title and a few words, too.
I took this photo last winter on the Seven Mile Bridge in the Florida Keys. They experienced an unusual cold spell while we were there (hence the coat). We decided to go for a bike ride on this cloudy day.
The journalling reads: The air is chilly, the sky is ominous, the wind threatens to knock me to the ground. This is... A Beautiful Day.
Monday, February 14, 2011
Travelling the world
Here's another layout idea for the Book of Me. And by "Me" I mean "oneself" (to get started on a Book of Me, go to my earlier post here). I love to travel, and I decided to do a layout about the places I've been and would like to go.
I decided to make it simple, as it would have been WAY too cluttered if I tried to include pictures from everywhere on the list.
I wanted to include a picture of myself in the background, but to make it a little subdued. To do this, I turned the photo to black and white and then lightened it a bit.
To give it the blotchy effect, go to colors > posterize. This reduces the number of colors in the image. Adjust to get the desired effect.
For the map, I took one off the web, erased the ocean part, and used a red paintbrush on the spots I've been.
There are lots of different themes you can do for the Book of Me. Any other ideas?
Saturday, February 12, 2011
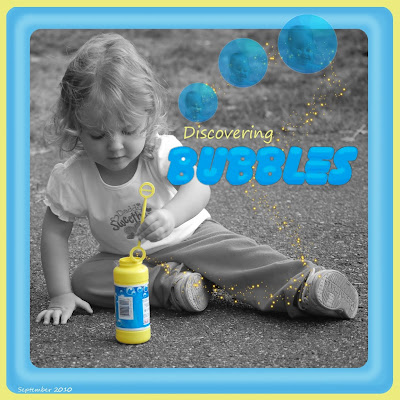
Color splash!
I remember I used to be so impressed when I saw wedding photos with the flowers in color and the rest of the photo in black and white. I think those photographers impress many people with these tricks, as most of them command thousands of dollars for a wedding.
This trick is super easy to do in GIMP. Just select the area you want to remain in color, go to select > invert, then color > hue-saturation, and a move the "saturation" bar down to -100.
I like to use color splash because I think that a simple color scheme is more pleasing than a layout with every color in the rainbow. For this layout, I think the blue and yellow went well together.
The hard part is deciding which photos to use the effect on. I decided to do a color splash on this photo because the yellow of the bubble bottle was so bright and she was looking at it so intently.
For the bubbles, I painted one and duplicated it twice. To paint the bubble, I simply opened a new layer, made a circle selection, filled it with light blue, and added some dodge and burn. I drew a thin white line around it to make it more realistic.
I added a picture of my daughter's face in the reflection for fun. To give the reflection a rounded look, I did a lens distortion on the face.
I adjusted the opacity down to make it transparent, then flattened the bubble and duplicated the layer twice. I then scaled each bubble to give a little depth perspective.
What colors do you think go well together? I'm going to go through my photos and think of different color schemes to use for layouts.
Thursday, February 10, 2011
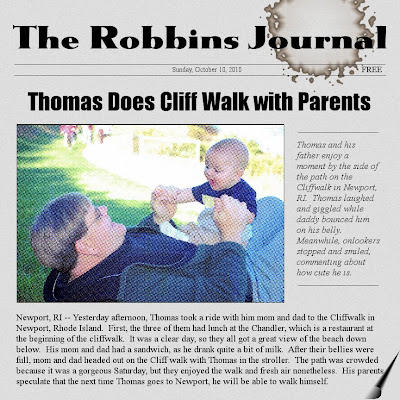
Making a newspaper layout
Ever try making a layout that looks like a newspaper? I got the idea when I was playing around with the filters and I found the "newsprint" filter. Go to filters > distort > newsprint.
Ok, so it doesn't look exactly like a newspaper, but getting it perfect would have taken way more time and aggravation than I was willing to spend on this layout.
I set the background layer to a light grey. I added some noise and Gaussian blur to get the desired paper texture. The page curl effect can be found under filter > distorts > pagecurl. The coffee stain (most things in this house get stained from coffee) can be found under filters > decor > coffee stain. Play with different fonts to get the desired look. The text is Times New Roman and I put the caption in italics.
This is a photo I took of my husband and son on the Cliff Walk in Newport. I thought it would be cute to portray it as a "news" report. I'll put it in my bag of tricks and will probably do more of these in the future.
DID YOU KNOW? To draw a straight line, hold the "shift" button down. To draw one that is perfectly horizontal or vertical, hold down the "shift+ctrl" button. I wouldn't have figured out how to draw the lines on this layout without these keyboard shortcuts.
A book of me
A book of me? That sounds so narcissistic! Yes, it certainly does. However, I'll rationalize it this way: I think EVERYONE should make a book about themselves, and shamelessly plaster their face all over it.
Seriously, though, don't you want your life story to be told? And who knows you better than you do? I do tons of pages about my kids, but I was afraid to do anything about myself because I thought it would come off as self-indulgent. I got over it by making a layout that made me look silly.
I had fun making this layout. There's nothing tricky with this one, so I won't go into the technical details. My point with this post is to say that self-deprecation can improve self-confidence greatly.
I'll give you a sample of some of the journaling: Make time for hobbies, take a walk in the cold weather, never iron casual clothing, don't even try to fold fitted sheets, turn off the TV, use babysitters when they offer, start a snowball fight, write bad poetry... you get the idea.
This layout set the ball rolling and I've created several more layouts featuring yours truly. More to come. Enjoy.
Textured backgrounds
I've been experimenting with textured backgrounds. There are tons of free textured backgrounds you can download for free on the web, but I like to create my own elements whenever possible. This one is super easy if you have a scanner. Just take a piece of paper, crumple it up, and scan it. Then open your image, and cut and paste into your layout. That's pretty my how to do it.
Once I had it in my layout, I lightened it enough to make the text easy to read. If you're feeling even more creative, play with the layer mode to get different funky effects, like "lighten only" or "darken only."
Creating your own textured backgrounds is just one more way that digital is way better than traditional (in my humble opinion). There are just an infinite number of ways to create backgrounds, without having to shop around in the craft store!
Anyway, the pics in this layout are over 3 years old, taken a few months before we got married. I look goofy in them but I don't care. It made me think of the perfect subtitle: "Even a bad snapshot is beautiful when the faces are happy." Ah, the carefree (i.e. child-free) days!
Making a pencil rendition of a photo
Here's a sketch of my dad and my son based on a photo I took. Yes, it's a computer redition. But there was alot more work than just hitting a few buttons.
First, let me give credit where credit is due. I followed the instructions of a tutorial I found here.
However, there is one thing I need to emphasize. At the end of following the steps, the picture just looked like blank white. You need to duplicate the layer and set it to "multiply" and duplicate that multiply layer several times before the lines are visible. I believe I duplicated it about five times initially.
The duplication of the layers started to create noise (too many black dots). I flattened the image, took a fuzzy eraser, set the opacity to around 50%, and gently erased between the lines. I also made the black lines clearer by using the pencil tool to redraw the major lines. I flattened it again and made a few more multiply layers to darken the image.
I tried to make one of my mom and my daughter, but every attempt created a very unflattering image of my mother. You see, a pencil sketch emphasizes lines, which is not friendly to any age-conscious person over 20. It seriously made my mom look like a wrinkly old woman! I didn't dare try to make one of myself. Lesson learned -- stick to children and people who don't mind the lines on their faces!
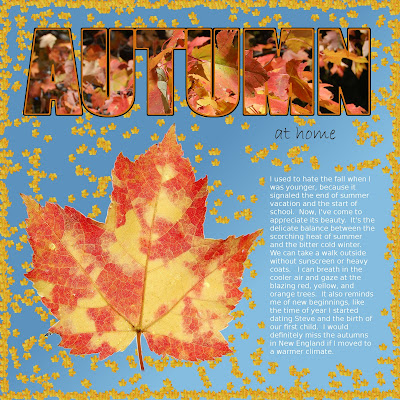
Autumn leaves
I love the autumns here in New England, and I love taking pictures of the leaves in all their splendor. Although yes, I realize that autumn seems like a distant memory as we are buried under all this snow.
For the background, I used a dark-to-light blue gradient to simulate the color of the sky. The photo of the large leaf was taken against the sky, but I cropped around it so I could get a seamless background in a 12x12 format.
For the yellow leaves, I made a photo of a yellow leaf into a GIMP brush. I then created the maximum amount of jitter and adjusted the spacing to make it look random. To get the different orientation of the leaves, I just duplicated the layer twice and rotated 90 and -90 degrees, respectively. I merged the layers together to simplify, and erased the leaves that fell under the text.
For the border, I did a rectangle select close to the edge, went to edit > stroke selection, and selected "paintbrush." I decreased the spacing and jitter to make the leaves clump together a bit more.
The title is "impact condensed" font. I added the image in a new layer, right-clicked on the text layer and selected "alpha to selection," inverted the selection, went back to the image layer and pressed "delete." I created a border of brown and orange to make the text more readable.
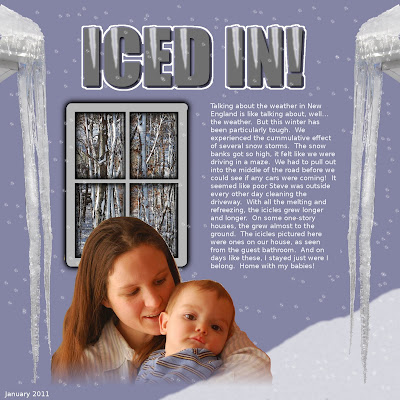
Icy weather!
So, I wanted to do a layout about the crazy amount of ice we've been getting in the RI/ southern Mass area. The icicles on every house got many, many feet long, and our's was no exception. I'm jut glad I didn't have to drive too much in it, but I feel bad for everyone who's evening commute slowed to a crawl.
The photo on the left and right are from our house. In fact, in case you didn't notice, they are mirror images of each other (I know, I'm so tricky.)
For the snow flakes, I used the galaxy brush, set the jitter to maximum, and painted away.
I drew the window using simple lines, threw in a drop shadow, and cropped a picture of the woods in our backyard to go inside it.
For the icicles on the title, I just painted one and duplicated it. I set the opacity down to make it a little more realistic (though, admittedly, they still aren't very realistic.) I made a white outline to make the title stick out a little more.
I simply painted the snowbank in white, blurred it, and adjusted the opacity down a bit.
For the photo of my son and I, I just cropped around us and added a layer mask on the bottom to eliminate the harsh line.
Thanks for viewing and I hope you enjoy.
Subscribe to:
Posts (Atom)