Monday, May 16, 2011

Ideas for a Book of Me


We scrapbook about our kids, our trip to the park, our dog, and everything else except ourselves. Indeed, many of us (including myself) are hesitant to scrapbook about ourselves. There are several reasons for this that I can think of:

1)It is considered impolite or narcissistic to talk about ourselves.

2)We are usually the ones behind the camera, and thus are left with few pictures of ourselves.

3)We think it has to be deep and serious (for more about that visit this post).

4)We get stuck in the habit of recording events, and forget to put things in a broader, more meaningful context.

Yet telling our life story is important. It is also easier than you may think. Most of us already have an online profile, and we tell our story through words and pictures we post on Facebook and other social networking sites. In fact, it is a simple step to organize that into a scrapbook. Here are some ideas I've either done myself, seen others do, or plan to do in the future:

  • Favorite things. This could be very general (think “Sound of Music”) or it could be specific, such as favorite foods, book, movies, or anything else.

  • Places I've been or would like to go

  • Names: Nicknames, maiden names, meaning of your name

  • Goals you have, or goals you've accomplished and how you did it

  • Why people think I'm weird (if you're brave)

  • Celebrities that friends have compared to you, including pictures

  • Then & Now – Comparing a childhood picture with a recent one, how I've changed, if I knew then what I know now

  • A day in the life of me

  • About me in a casual, stream-of-consciousness style

  • Your job – a description of your job, why you like it (or don't like it), why your job is important

The possibilities are endless, and these are just a few of them. Remember, your life story is worth telling, so start scrapping about it!

Monday, May 9, 2011

Creating texture with brushes


When I started digital scrapbooking, I didn't really know the power of the brush. I figured that the brush tool is just used for drawing and writing, and I stuck with the circle-shaped brush that came with the program.

Then I realized that there are many kinds of brushes out there, in many shapes and colors. I noticed other scrapbookers were using them as stamps to make beautiful embellishments. Still, I held out for a while. I figured that it amounted to using someone else's work, and I wanted to do as much as I could do myself. I even experimented with making my own brushes, as described here.

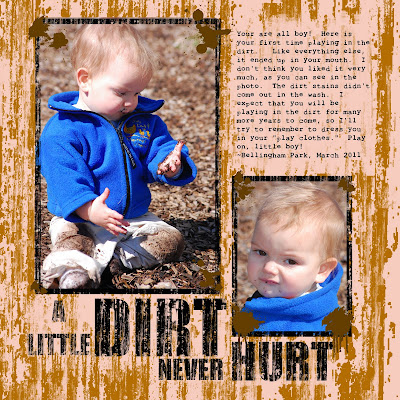
My scrapbooking style is generally clean and simple, but some layouts call for something a little more fun. Certainly, a layout of a boy in the dirt needs a dirty texture. Yet I had always had trouble when I tried to create texture with the GIMP's basic tools. The artistic filters just weren't cutting it. I definitely needed the right brush.

The Journaling reads:

You are all boy! Here is your first time playing in the dirt. Like everything else, it ended up in your mouth. I don't think you liked it very much, as you can see in the photo. The dirt stains didn't come out in the wash, either. I expect that you will be playing in the dirt for many more years to come, so I'll try to remember to dress you in your "play clothes." Play on, little boy!
~Bellingham Park, March 2011


Doing a quick Google search, I realized that there are lots of messy, grunge-style brushes out there. The brush I used in this layout is from a brush set called “Scratchie” at DeviantArt here. They served my purpose to create a messy, streaky look.

To create the effect, I chose a nice brown color and stamped away. I then went over it again using the same brush as an eraser. I used different sizes and tried to make it as random as possible to avoid creating a repetitive pattern.

I used the same brush to make distressed lettering. Big and bold font works best to create the distressed texturing without destroying the letters. I used “Impact Condensed.” I then used the erase brush and randomly stamped on top of the letters to create a worn appearance. To make the letters more legible, I used the erase brush on the “dirt” under the letters to create more contrast. All-in-all, I think it came out dirty enough to complement my son's hands, knees, and face.

There is a huge variety of free brushes on the Internet. Most are compatible with both Photoshop and GIMP. While many people have spent hundreds of dollars for Photoshop, us GIMP users can get the same stuff with our free program.

Be sure to read the terms of use before using the brushes. Most permit free, unlimited personal use as long as we give credit. Many also allow commercial use, but some charge a royalty fee.

Indeed, the power of the brush has overtaken my need to earn artistic merit. Now that I have started to use pre-made brushes, I don't think that I can go back to my strict DIY ways. Digital brushes are one of the most versatile tools available to us digital scrapbookers, and creating texture is just one way to use them.

Monday, May 2, 2011

Drawing sketches in your scrapbook layout


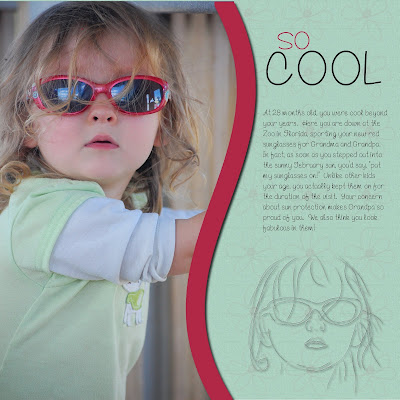
I love combining drawings with photos, and a scrapbook page is a great place to do it! Incorporating drawings makes your scrapbook layout truly unique.

Many scrappers accent their layout with a smaller, faded version of the main photo. It's almost like a visual echo. This type of repetition is attractive because it creates visual harmony. It is also very easy to do on the computer because it is so easy to duplicate images.

I took this concept one step further and simply made a sketch out of the photo. How do I do this, you ask? Drum roll please... I traced it!

My drawing skills are very limited, so I had to do this the easy way. The sketch took me about five minutes. I simply opened a new layer, traced the major lines, then shrunk it and moved it to the side.

You can use a mouse, but a pen tablet works better. A pen tablet works like a mouse but is shaped like a pen. You use the pen to draw or write directly on the computer. Here is the one I use.

There are many other ways to incorporate artwork in your scrapbook pages. You could create a more detailed drawing with the method I've described here. You could sketch in different colors or include a digital painting with a photo. There are endless possibilities, and I intend to explore more of them.